Thursday, February 26, 2015

Mechanicum Kiros: Finished

My scratchbuild Kiros is finished.


Okay, it'll never pass for the actual model but it turned out well enough regardless.


And yes it is yellow instead of traditional Mars red. I'm a Rebel.


The back of the Tech Priest's control alcove is covered with ports.
Partially because I didn't want a blank space.
Partially in-case I go completely insane and build an Ordinatus to connect to it.


Wednesday, February 25, 2015

Thunderhawk: Part 5

I am not sure what is says about my bits box when I have enough weapons for a Thunderhawk just lying around....


The front heavy bolters are a pair of re-purposed Leman Russ sponsons. The heavy flamers were trimmed off and replaced with some scratchbuilt heavy bolter barrels.


Some stormraven lascannons solve the lascannon problem.


I threw together the under-wing heavy bolter mounts from some hunter killer missile brackets.
The missiles are from the Taurox (leftmost) and the Valkyrie (rightmost) kits.


The main cannon is built from the same plastic tubing I use for everything.


And here's a scale shot with a Stormtalon.

Almost finished. Next up it needs riveting, and then painting.

Sunday, February 22, 2015

Vostroyan Creed

A simple conversion from about a year ago that I finally got around to finishing.

Now, your standard Colonel Creed looks something like this.


Not a bad model, but very Cadian. He'd never fit in with Vostroyans.

He's had his whole head and collar drilled out. This was replaced with a new one with a sculpted moustache and big fluffy hat.
Greenstuff fur added to the collar and cuffs.
Finally the inner jacket was extended down and covered with a layer of chainmail.


One quick coat of paint and he looks okay.


Thursday, February 19, 2015

Thunderhawk: Part 4

We have wings and engines!
Though I did go completely off script with both.

The template would have given me two multi part hollow wings. For something that should be a gaming piece this would not have been solid enough.Instead I just used the outer surface pieces over foamcore board. The result is much sturdier while still being light enough that it wont stress the connection point..


The engines were an odd combination of good and bad luck.
Bad luck in that this exact moment I ran out of the cheap glue I was using to glue the hull layers to each other (hence the peeling corners you can see in the photo).
However it's good luck to end up with two identical perfectly sized tubes. I glued the cap on upside down, added some card bands to the outside and glued in an intake fan from some cheap toy or another.
BAM, engines.

Next I need to source armaments.
According the the Thunderhawk datasheet I'll need to find the following.

  • 1 main cannon. (Scratchbuild from the ol' plastic tubing.)
  • 2 lascannons (Maybe some IG players have spares?)
  • 4 twin linked heavy bolters.... so 8 heavy bolters. Which need to match each other. That one is going to be the most difficult I think.
  • 6 missiles. Possibly more difficult than the heavy bolters. What has spare missiles on it?

Wednesday, February 18, 2015

Thunderhawk: Part 3

It is starting to look like a Thunderhawk gunship now. Vaguely anyway.


I have had to go off script a bit, this is not the easiest template I have ever followed. The wings are a little stubby and I have yet to work out what I am doing about engines.

Do not ask me about arming this thing.


Monday, February 16, 2015

The best kind of dwarves

No not Squats.... (though I might try the in them future)

I am talking about Chaos Dwarfs!
My take on Chaos Dwarfs is a mix of the old 80s big hats and the new forgeworld heavily armoured models. Mixed with quite a lot of "easy to make".


Plastic dwarfs. Good place to start. Need to braid up that beard though. Nothing says evil like dreadlock beards. It also helps cover up those ancestor faces that regular dwarfs seem so fond of.


Snip off the top of the dwarf helmets and add a proper hat. The hats are made from the now infamous plastic tubing I use for everything on here. Greenstuff on some chaos-y stuff and glue on a spike. And huzzah. I am trying out green stuff masks but so far I am unconvinced.


Hashut be praised!

Saturday, February 14, 2015

Mechanicum Kiros: Part 2

Most of the actual build work is finished.
The tech-priest is housed in his own little pulpit.


The actual chassis is pretty sparse.


I built a gun housing out of an earthshaker gun shield and more plastic tubes. I made this one up pretty much as I went along so I am lucky that it worked out well enough.


The whole kit-n-kaboodle.


There is a bit of detailing work left and then just a coat of paint.

Thursday, February 12, 2015

Thunderhawk: Part 2

Progress was going well...

until I realised I had built part of the fuselage back to front. 
Way to go.


Maybe half finished now.

Wednesday, February 11, 2015

Mechanicum Tech Thralls

Still working on my Mechanicum force.

This time we have my first try on some tech thralls. These troops are a little more cyborg than the Skitarii foot soldiers but are not full fledged battle automata.
Here you can see my (probably terribly inefficient) creative process from start to finish.

Most things start with a drawing.


Typically these are done when I should be doing much more important things with my time, and will detail a project way beyond my abilities. This time I was lucky and was almost somewhat sensible.

Then I start throwing bits at it.


I started with plastic Cadians (because I had some lying around already).
The chest plate is filed smooth. Onto the front I added a little stamped Adeptus Mechanicus icon. I dropped the crotch-plate because I forgot about it until after I finished painting the first guy.


I made the heads using a little bit of round plastic tube and some greenstuff to round off the top. When cured I filed the join smooth and added a simple lip along the bottom.
The backpacks were just lying in my bitsbox, no idea what they come from.


For arms I am using servitor arms trimmed down slightly and yet more plastic tubing (I use it for everything).


A coat of paint and it is ready for basing.
Easy to make and they look pretty unique. Not a patch on the real forgeworld ones but good enough I think.

Tuesday, February 10, 2015

Thunderhawk: Part 1

Everyone and their Granny has a scratchbuild thunderhawk project going. Partially because they are cool and partially because most people don't want to actually buy one.

Here is mine so far.


It's made using one of Eli Pateroch's excelent paper templates and layers of cardstock.
According to my plans this is the first third done.

I am not looking forward to adding all of those  rivets.

Monday, February 9, 2015

Mechanicum Kiros: Part 1

So I might be working on a small Adeptus Mechanicus force. Just a small one to attach to my pre-heresy Sons of Horus (that's a project for another day).
I mostly blame this on pretty pictures of fancy forgeworld automata miniatures. Curse you forgeworld and your fantastic levels of quality.

Because I am a glutton for punishment (and don't have thousands of pounds to spare for forgeworld toys) I decided to heavily convert and build everything totally from scratch. We will see how long that holds up. I give it two weeks.

The main battle tank of the Mechanicus is the Kiros.

Source: Forgeworld

It looks more of a moving gun platform than main line tank but who am I to question the Martians. The key components of the body are those two large track sections and the pilot's cradle for the techpriest.
So that is where I began.
I don't have photos from the progress before this so you'll just have to use your imagination.

My Take on the Kiros is much cruder and simpler (mostly because I am working in my garage not a top of the line sculpting and casting studio) but in all it is beginning to take shape.

 The track sections were built in layers. In the centre of each track is two layers of foamcore. Onto that there are layers of plastic cogwheels, some home made pistons and a plasticard outer shell.


The track pieces are from the very old ork armor plates sprue as well as casts of the same plates to make up the numbers.

Sunday, February 8, 2015

Start on a high note.

Starting with a really old one.
Because it's good.
*cough*notjustbecauseIhaven'tgotanyrecentphotos*cough*

Many moons ago when the sun was warmer and dragons roamed the Earth. I was but a young Bel making my way through the steppes with naught but an axe, the skin of some fearsome beast for warmth and a chainmail bikini to eat.

Okay it was actually 2 years ago and I was living in Cardiff. Shut up it's my story.

On those barren and blasted post-apocalyptic plains I met a man. This man commissioned me to build for him a Chaos Space marine unlike any other.

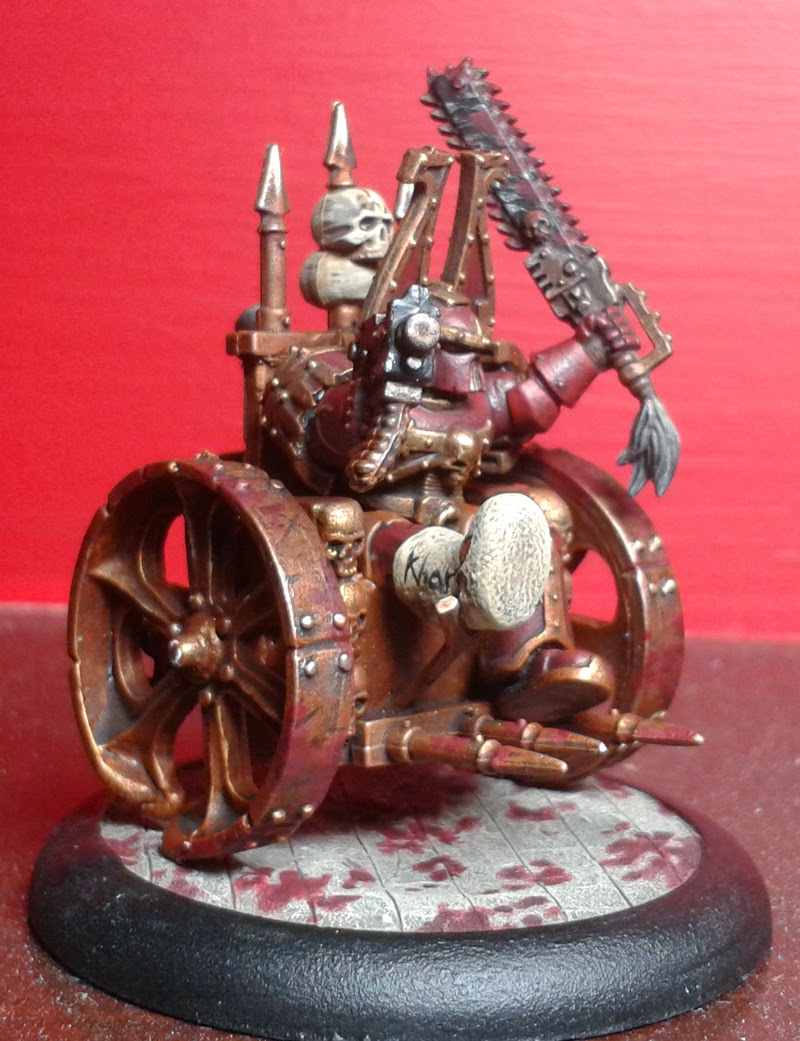
While the actual details were up to me, it had to feature a Khorne berserker in a wheelchair. It was going to be a joke get well gift for his boss who had recently broken his leg.

And lo! This was lovingly crafted.
 the client's boss plays World Eater Chaos Space Marines so I knew I'd be working with red, brass and skulls.
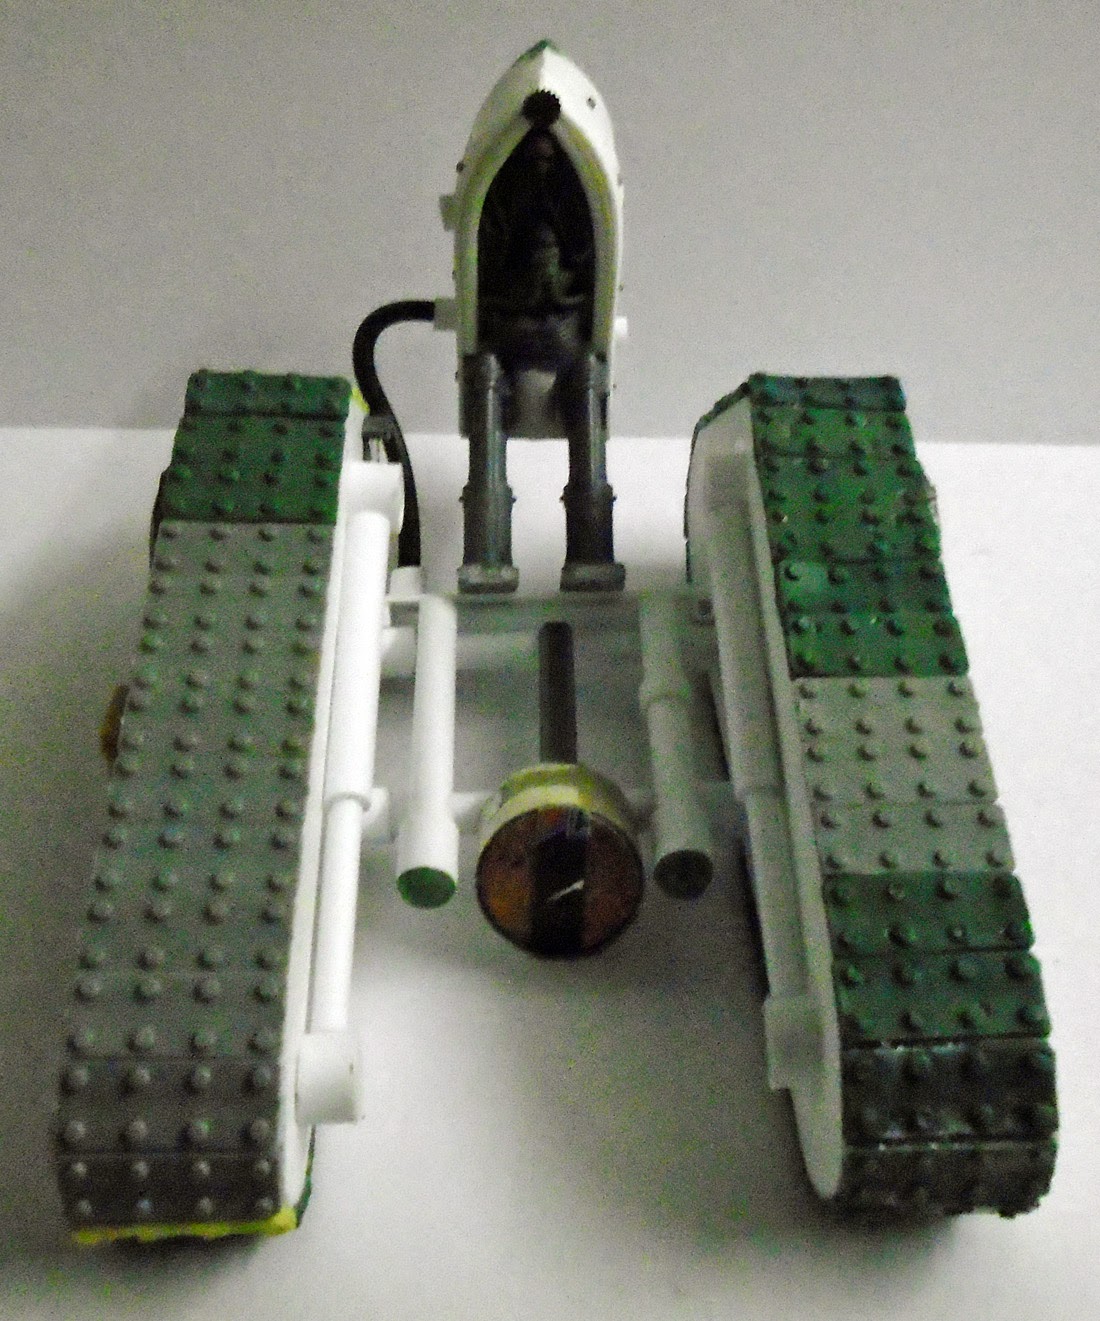
 The chair it mostly made from layered sheets of plasticard made into a rough chair shape and then sanded smooth. The skulls on the back and arm rests are made using a stamp mould of a spare skull I had lying around. A few spikes from the chaos vehicle spikey bits sprue finished off the chair body. A pair of old ork big gun wheels finished of the ...well, the wheels..
You can only see the exhaust here but there is an engine built from a couple of spare ork bits strapped to that chair.

Hark at the painting from the days before I understood weathering, chipped paint or even how to paint half decent looking blood.

Last of all the leg cast is just good old green stuff. Patted with a bit of fabric to give it a nice texture.
I couldn't resist adding a little something extra to the cast.

Quite frankly, this is still one of my favourite commissions. I have learned a thing or two since then but it was fun to build, fun to paint and the client liked it. Would that they could all be this interesting.

If I had to do it again, I totally would. And I'd add more spikes.
~Bel.

Admitting it is the first step.

I have a problem

I currently find that I have far too much time on my hands and no constructive useful way to fill it. I find that I spend too much of said hand time building and painting a staggering variety of tiny plastic toy soldiers. Or designing more and more elaborate projects to follow my current overly elaborate projects.

And now I am blogging about it so I can inflict my progress and ideas on anyone who happens to walk within inflicting range?

If you are as deeply sad as I am and think you're down for that, stick around. There'll be conversions, scratchbuilds, maybe a couple of completely original sculpts if I feel up to it..

I have a problem.
~Bel